This post may contain affiliate links. When you purchase through links on our site, we may earn an affiliate commission.
Resin art has emerged as a captivating and versatile medium that allows artists to create stunning pieces that can range from functional items to purely decorative works. I find the allure of resin art lies in its ability to encapsulate colors, textures, and even objects within a glossy, glass-like finish. The process of mixing resin and hardener, pouring it into molds or onto surfaces, and watching it transform into a vibrant piece of art is nothing short of magical.
As I delve deeper into this creative realm, I discover that resin art not only offers endless possibilities for expression but also serves as a therapeutic outlet for many artists, including myself. The beauty of resin art is that it can be both simple and complex, making it accessible to beginners while still providing challenges for seasoned artists. I have often found myself mesmerized by the way resin can mimic natural elements like water, marble, or even galaxies.
Each piece tells a story, whether it’s a coasters set that captures the essence of ocean waves or a wall art piece that evokes the mystery of a starry night. As I explore this medium, I am continually inspired by the unique ways in which resin can be manipulated to create depth, movement, and emotion in my artwork.
Key Takeaways
- Resin art is a versatile and creative form of art that involves using resin as the main medium to create stunning pieces.
- The materials and tools needed for resin art projects include resin, hardener, mixing cups, stirring sticks, molds, and protective gear such as gloves and a mask.
- Basic techniques for working with resin include mixing the resin and hardener, pouring the resin into molds, adding colorants and embellishments, and removing air bubbles.
- Simple resin art project ideas for beginners include making coasters, jewelry, keychains, and decorative trays using various molds and color combinations.
- Tips for creating beautiful resin art pieces include working in a well-ventilated area, taking your time with each step, and experimenting with different techniques and designs.
Materials and Tools Needed for Resin Art Projects
To embark on my resin art journey, I quickly learned that having the right materials and tools is essential for achieving the best results. The primary ingredient in any resin project is, of course, the epoxy resin itself. I typically choose a high-quality epoxy resin that is specifically designed for art projects, as it tends to have fewer bubbles and provides a clearer finish.
Alongside the resin, I also need a hardener, which is mixed with the resin in a specific ratio to initiate the curing process. It’s crucial for me to follow the manufacturer’s instructions closely to ensure a successful outcome. In addition to the resin and hardener, I gather various pigments and dyes to add color to my creations.
I enjoy experimenting with different types of colorants, such as alcohol inks, mica powders, and liquid pigments. Each type offers a unique effect, allowing me to achieve everything from vibrant hues to subtle shimmers. Furthermore, I make sure to have mixing cups, stir sticks, and gloves on hand to protect my skin and ensure accurate measurements.
A heat gun or torch is also a valuable tool in my arsenal, as it helps eliminate bubbles that may form during the mixing process.
Basic Techniques for Working with Resin
As I began working with resin, I quickly discovered several basic techniques that would serve as the foundation for my projects. One of the first techniques I mastered was the art of mixing. It’s essential for me to mix the resin and hardener thoroughly to avoid any sticky or tacky spots in my finished piece.
I usually mix them in a clear cup so I can see when they are fully combined, ensuring there are no streaks left behind. This step is crucial because improper mixing can lead to incomplete curing. Another technique that has become second nature to me is pouring.
Depending on the desired effect, I can pour the resin directly onto a surface or into molds. When pouring onto a surface, I often use a technique called “dirty pour,” where I layer different colors in one cup before pouring them out. This creates beautiful swirls and patterns that are visually striking.
Additionally, I’ve learned about layering resin; by allowing each layer to cure partially before adding another, I can create depth and dimension in my artwork.
Simple Resin Art Project Ideas for Beginners
| Project Idea | Description |
|---|---|
| Coaster Set | Create a set of colorful resin coasters using different molds and pigments. |
| Pendant Necklace | Design unique resin pendants by embedding small objects or adding swirls of color. |
| Keychains | Make personalized keychains by pouring resin into silicone molds and adding embellishments. |
| Wall Art | Experiment with resin pouring techniques to create abstract or landscape wall art pieces. |
For those just starting out in resin art, there are numerous simple project ideas that can help build confidence and skills. One of my favorite beginner projects is creating coasters. Using silicone molds, I can experiment with different colors and techniques without the pressure of creating a large piece.
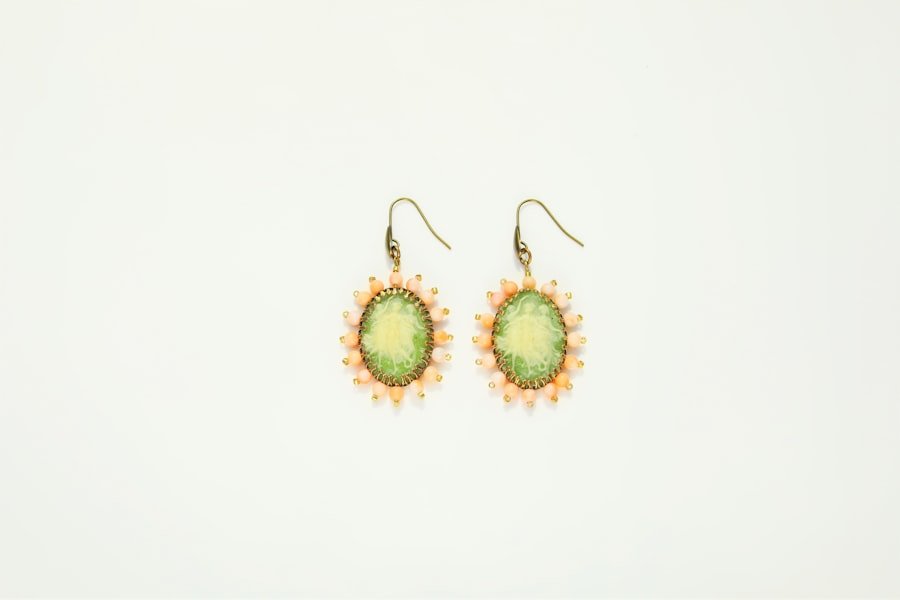
Coasters are practical items that allow me to showcase my creativity while also being functional. Another enjoyable project is making jewelry pieces such as pendants or earrings. By using smaller molds and incorporating dried flowers or glitter, I can create unique accessories that reflect my personal style.
This project not only allows me to practice my pouring techniques but also results in beautiful gifts for friends and family. As I continue to explore resin art, I find that these simple projects serve as stepping stones toward more complex creations.
Tips for Creating Beautiful Resin Art Pieces
As I’ve honed my skills in resin art, I’ve gathered several tips that have significantly improved the quality of my work. One key tip is to work in a well-ventilated area. The fumes from resin can be strong, so ensuring proper airflow helps keep me safe while working on my projects.
Additionally, I always wear gloves and protective eyewear to safeguard against any accidental spills or splashes. Another important aspect of creating beautiful resin art is patience. Allowing each layer to cure properly before adding more can make a significant difference in the final outcome.
Rushing through the process often leads to imperfections that could have been avoided with a little extra time. Furthermore, experimenting with different techniques and materials is essential for growth as an artist. Each project teaches me something new, whether it’s about color mixing or how different additives react with resin.
Troubleshooting Common Issues with Resin Art

Despite my best efforts, I’ve encountered various challenges while working with resin art. One common issue is bubbles forming during the mixing process or while pouring. To combat this problem, I’ve learned to use a heat gun or torch gently over the surface after pouring; this helps release trapped air bubbles and creates a smoother finish.
However, it’s important for me to be cautious not to overheat the resin, as this can lead to other complications. Another issue I’ve faced is sticky or tacky spots on my finished pieces. This often occurs when the resin hasn’t been mixed thoroughly or if it was poured too thickly in one layer.
To avoid this problem, I always ensure that I mix the resin and hardener thoroughly and pour in thin layers when necessary. If I do end up with a tacky surface, I’ve found that lightly sanding it down and applying another layer of resin can often remedy the situation.
How to Properly Cure and Finish Resin Art Pieces
Curing is one of the most critical steps in creating resin art pieces, and understanding how to do it properly has greatly improved my results. After pouring my resin mixture into molds or onto surfaces, I allow it to cure undisturbed in a dust-free environment for at least 24 hours. During this time, it’s essential for me to keep an eye on temperature and humidity levels since these factors can affect the curing process.
Once fully cured, finishing touches can elevate my artwork even further. If necessary, I sand down any rough edges or imperfections using fine-grit sandpaper before applying a final layer of resin for added shine and protection. This step not only enhances the appearance but also ensures durability in my pieces.
Finally, I often apply a coat of clear spray sealant for extra protection against scratches or UV damage.
Inspiration for Advancing Your Resin Art Skills
As I continue my journey in resin art, seeking inspiration has become an integral part of my creative process. Social media platforms like Instagram and Pinterest are treasure troves of ideas where artists share their work and techniques. Following other resin artists allows me to learn new methods while also sparking my imagination for future projects.
Additionally, attending workshops or online classes has proven invaluable for advancing my skills. Engaging with fellow artists provides opportunities for collaboration and feedback that can help refine my techniques further. As I explore different styles and approaches within resin art—such as incorporating mixed media or experimenting with larger installations—I find myself continually inspired by the endless possibilities this medium offers.
In conclusion, my journey into the world of resin art has been both rewarding and enlightening. From understanding the materials needed to mastering basic techniques and troubleshooting common issues, each step has contributed to my growth as an artist. With every project completed, I feel more confident in my abilities and excited about what lies ahead in this vibrant creative field.
If you’re looking for more creative projects to try, check out this article on crafting a serene home environment. It offers tips and ideas for creating a peaceful and inviting space that you can enjoy while working on your resin art projects. Creating a cozy and inspiring environment can help boost your creativity and make the process even more enjoyable.
FAQs
What is resin art?
Resin art involves using epoxy resin to create beautiful and glossy artwork. It can be used to create a variety of projects, including jewelry, coasters, and paintings.
Is resin art suitable for beginners?
Yes, resin art can be beginner-friendly with the right guidance and techniques. There are many simple projects that are perfect for those new to working with resin.
What are some beginner-friendly resin art projects?
Some beginner-friendly resin art projects include making resin coasters, creating resin jewelry, and experimenting with resin painting techniques.
What materials do I need for beginner-friendly resin art projects?
For beginner-friendly resin art projects, you will need epoxy resin, mixing cups, stirring sticks, silicone molds, resin dyes or pigments, and a heat gun or torch for removing air bubbles.
Are there any safety precautions to consider when working with resin?
Yes, it is important to work in a well-ventilated area and wear gloves and a mask to protect yourself from the fumes and potential skin irritation. It is also important to follow the manufacturer’s instructions for proper handling and disposal of resin materials.
 using WordPress and
No responses yet