This post may contain affiliate links. When you purchase through links on our site, we may earn an affiliate commission.
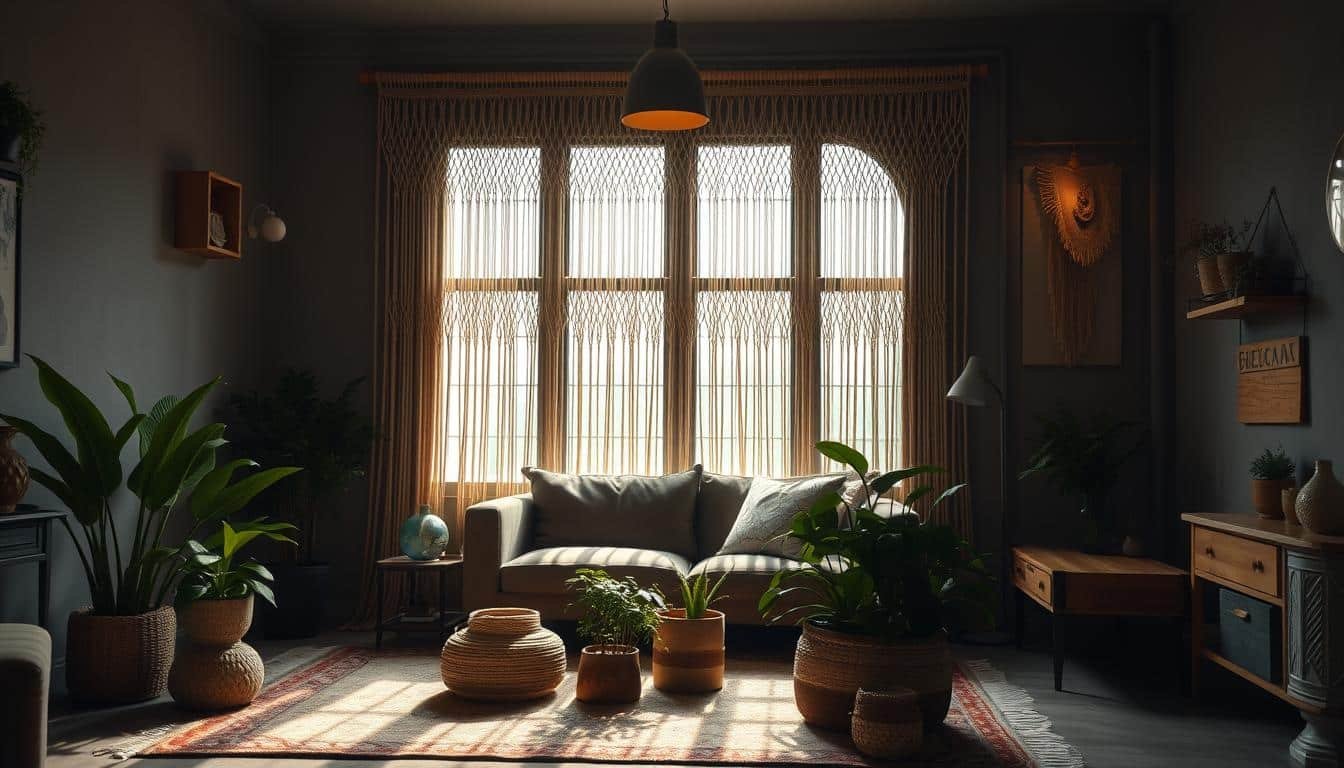
What if your window treatments could do more than just filter light? Imagine a piece of functional art that whispers freedom, texture, and warmth into your home. That’s the magic I discovered when I began crafting handmade textiles for my own space.
Years ago, I stumbled on a vintage beaded doorway covering at a flea market. It sparked a creative obsession. I wondered: could I blend that retro charm with today’s love for earthy, organic designs? That’s how my journey with knotted fiber creations began.
Through trial and error, I learned how square knots and simple patterns turn cords into stunning decor. My projects evolved from small wall hangings to full-length drapery that frames sunlight like a soft embrace. The best part? You don’t need expert skills. With free video guides and clear tutorials, even beginners can weave their way to a boho-chic sanctuary.
In this guide, I’ll walk you through my favorite designs—ones that balance airy minimalism with bold texture. Whether you’re refreshing a balcony nook or a sunlit living room, these ideas add soul to any corner. Ready to turn threads into a statement?
Key Takeaways
- Combine creativity with practicality using customizable window decor.
- Transform plain rooms with textured, handcrafted focal points.
- Adapt vintage inspiration into modern, free-spirited designs.
- Learn foundational techniques like square knots through accessible tutorials.
- Personalize projects to match your space’s color scheme and vibe.
Gathering Your Materials and Tools
The foundation of any great handmade project lies in its raw ingredients. I’ve learned that quality cords make all the difference—they hold their shape through intricate knots while adding that earthy charm we love. Let’s break down what you’ll need to create window treatments that feel both timeless and fresh.
https://www.youtube.com/watch?v=qa1HRyH6yjI
Essential Materials and Cords
Start with 3mm 3-ply twisted cotton string—it’s my go-to for durability and texture. A single curtain typically requires 600-800 feet, depending on length. I always buy extra; running out mid-project is heartbreaking. Pro tip: Stick to one brand for color consistency. Those slight variations between dye lots? They’ll stand out like mismatched socks.
Tools and Equipment Needed
Your toolkit should include:
- A sturdy wooden dowel (1″ diameter x 48″ length)
- Sharp fabric scissors—dull blades fray cords
- Measuring tape marked in inches and centimeters
- Wall hooks rated for 15+ pounds
That dowel isn’t just functional—it becomes part of the design. Sand any rough edges to prevent snagging. As my grandma used to say:
“Good tools don’t make you skilled, but they sure make skill possible.”
Now that your supplies are ready, we’ll dive into measuring tricks that ensure every knot aligns perfectly. Trust me, this prep work saves hours of frustration later!
Bohemian Macrame Curtain Ideas: Step-by-Step Guide
The secret to flawless fiber art lies in your first cut. I’ve found that precise measurements and intentional knotting turn simple strings into showstopping pieces. Let’s walk through the process I use to create flowing designs that frame sunlight beautifully.

Measuring, Cutting, and Attaching Strings
Start by determining your dowel’s hanging space. For a standard 36-inch rod, cut 60 strings at 144 inches each—this allows extra length for knots and trimming. Always add 20% to your initial measurement; shrinkage happens as you work!
| Dowel Length | Total Strings | Each String Length |
|---|---|---|
| 24 inches | 40 | 120 inches |
| 36 inches | 60 | 144 inches |
| 48 inches | 80 | 168 inches |
Fold each cord in half and secure it to the dowel with a lark’s head knot. This creates a clean base row. Pro tip: Number your strings with masking tape tags to avoid tangles—it saves time when patterns get complex.
Mastering Square Knots and Half Hitch Loops
Begin your first row 6 inches below the dowel. Take four strings: cross the left over the center two, then the right over the new left. Pull tight—that’s your square knot foundation. Alternate directions every third row for subtle chevron effects.
“Knots are like conversations—they tighten with patience,” says my friend Mara, a fellow fiber artist.
For half hitch loops, wrap one string around a pencil held horizontally. Secure it with neighboring cords. These loops add depth and catch breezes beautifully. I once spent a weekend testing 12 variations before landing on this method—now it’s my go-to for dynamic looks.
Keep a spray bottle nearby to mist stiff cords. Damp materials hold shapes better while knotting. If patterns drift, clip finished sections with binder clips to maintain alignment. Remember: Imperfections add character—your room deserves art that feels lived-in, not factory-made.
Customization and Style for Your Macrame Curtain
Your window treatment becomes a canvas when you infuse it with personal touches. I’ve found that mixing materials and colors creates pieces that feel uniquely yours—like wearable art for your windows. Let’s explore how to elevate basic designs into signature statements.

Color Play and Texture Fusion
Start by selecting cords that complement your room’s dominant hues. For coastal vibes, try pairing seafoam green with driftwood beads. Earthy spaces shine with terracotta and raw wooden accents. I keep this cheat sheet handy:
| Color Scheme | Bead Types | Texture Pairings |
|---|---|---|
| Desert Sunset | Clay discs | Chunky wool tassels |
| Mountain Mist | Glass spheres | Silky linen blends |
| Midnight Garden | Metallic hoops | Braided jute details |
Beads add movement and dimension. Thread them onto vertical strands before knotting—they’ll catch light differently throughout the day. My DIY hack? Use vintage necklace chains as beaded separators for industrial flair.
Pattern Innovation Through Knotting
Alternate between tight square knots and loose spiral designs to create rhythm. Try clustering three half-hitch loops every 12 inches for dramatic peaks. Last month, I experimented with diagonal knotting paths—the result framed my arched windows like cascading vines.
Quality craftsmanship shows in consistent tension. I test new patterns on 12-inch swatches first. As textile artist Lila Chen once told me:
“The best designs emerge when you break rules thoughtfully.”
This hands-on approach lets you troubleshoot without commitment. Remember—each knotting choice shapes the final experience. Your finished piece shouldn’t just hang… it should sing.
Maintenance, Care, and Longevity
Ever wondered how to keep your handmade textile looking vibrant year after year? Proper care transforms fleeting trends into lasting heirlooms. Let’s explore simple habits that protect your creation’s beauty and functionality.

Regular Cleaning and Dusting Techniques
Weekly dusting preserves texture. I use a soft-bristle brush in downward strokes—like petting a cat’s fur. For deeper cleans, lay the piece flat and vacuum through cheesecloth. This traps dust without snagging knots.
Spot spills immediately with cold water and a microfiber cloth. Blot—don’t rub! My choice for stubborn stains? Mix 1 tsp clear dish soap with 2 cups water. Test on hidden cords first to protect colors.
Proper Storage and Preservation Tips
When seasons change, roll your textile around acid-free paper tubes. Wrap in cotton sheets—plastic traps moisture. Store vertically to prevent creases in the pattern. I add cedar sachets to deter moths naturally.
For beginners, remember: sunlight fades fibers over time. Rotate hanging positions monthly if near windows. Want pro-level protection? Check my favorite UV-filtering sprays (affiliate links in bio).
“Gentle care extends art’s lifespan more than any fancy technique,” notes textile conservator Elena Torres.
These methods maintain privacy while letting your piece age gracefully. Your work isn’t just decor—it’s a story woven in threads. Treat it with the same love you poured into creating it.
Conclusion
This journey from threads to statement piece has taught me how handmade textiles breathe life into blank walls and sunlit corners. Through this guide, I’ve shared the same techniques that transformed my own space over the years—from choosing cotton cords to mastering tension in complex patterns.
Every knot ties practicality to creativity. Whether dressing a bedroom wall or framing patio doors, these designs adapt to your settings. The options are endless: mix bead sizes, alternate dye tones, or weave in recycled fabrics.
My favorite part? Seeing how others interpret these tutorial basics. A reader recently sent photos of her kitchen window treatment using seashell accents—proof that personal flair makes each piece sing. For more inspiration, explore the links to free patterns on my site.
Creating with your hands changes how you see spaces. What started as a weekend project became my daily meditation. Now it’s your turn—grab those cords and let them whisper boho charm into your home. I’d love to see what you craft!
 using WordPress and
No responses yet