
This post may contain affiliate links. When you purchase through links on our site, we may earn an affiliate commission.
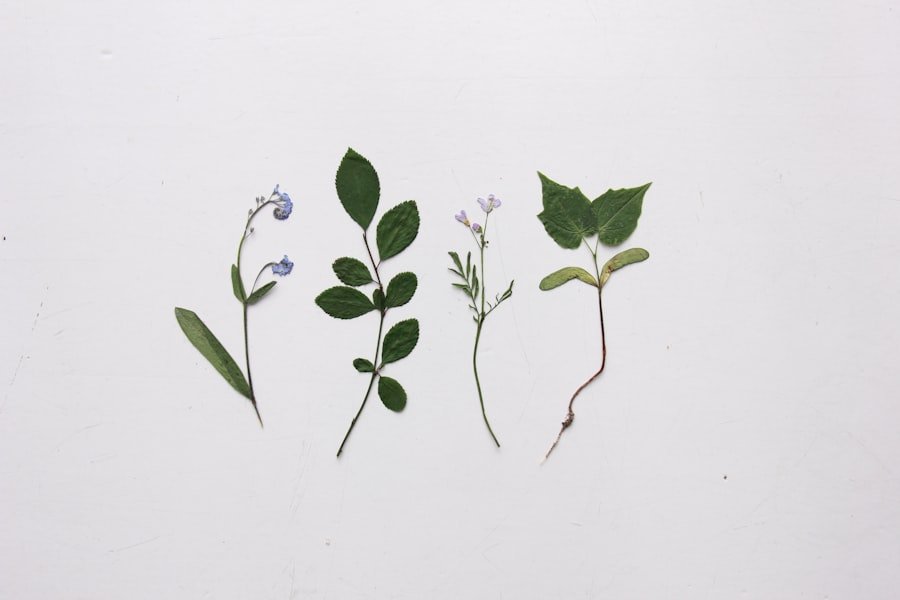
When it comes to pressing flowers, the selection process is crucial. I’ve learned that not all flowers are created equal in this art form. Some blooms lend themselves beautifully to pressing, while others may wilt or lose their color.
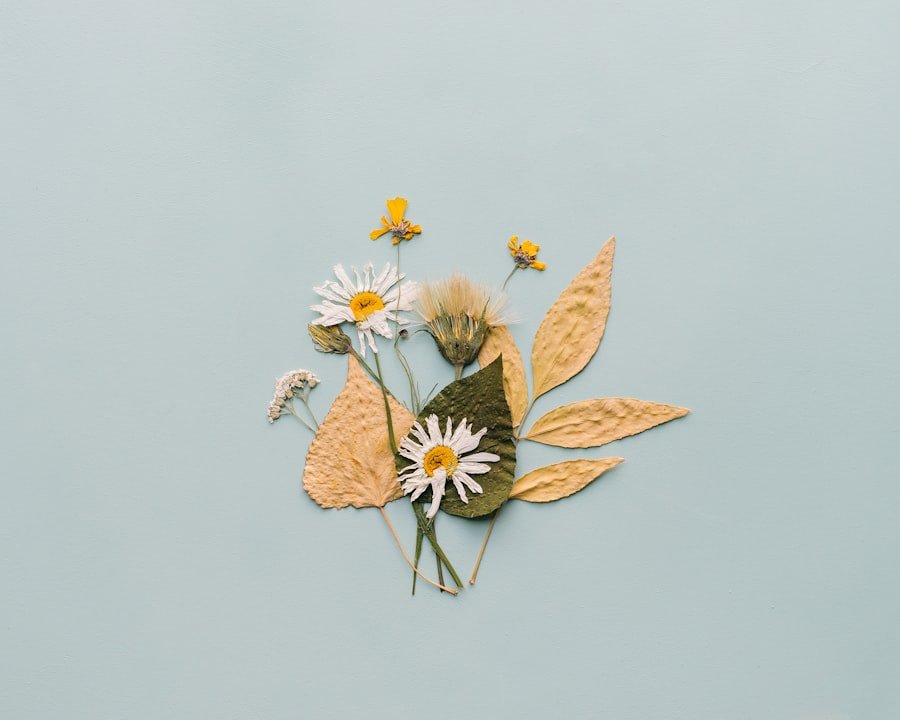
I often gravitate towards flat, thin flowers like pansies, violets, and daisies. Their delicate petals and compact shapes make them ideal candidates for pressing. Additionally, I find that flowers with vibrant colors tend to retain their beauty better than those with muted tones.
For instance, the bright yellows of marigolds or the deep blues of cornflowers can create stunning pressed pieces that stand out. In my experience, it’s also important to consider the seasonality of flowers. I often take advantage of spring and summer blooms, as they are typically more abundant and easier to find.
However, I’ve discovered that certain fall flowers, like asters and chrysanthemums, can also yield beautiful results. I make it a point to gather flowers early in the morning when they are still fresh and dewy. This not only helps preserve their color but also ensures that they are at their peak before any wilting occurs.
By being selective about the flowers I choose, I set myself up for success in creating vibrant pressed flower art.
Key Takeaways
- Choose flowers with flat petals and minimal moisture for pressing
- Remove excess moisture from flowers by pressing them between absorbent paper
- Traditional pressing involves using heavy books, while microwave pressing is quicker but may result in less vibrant colors
- Add a few drops of glycerin to the pressing process to help maintain vibrant colors
- Use pressed flowers for creating art, jewelry, or decorating cards and invitations
Preparing Flowers for Pressing
Once I’ve chosen my flowers, the next step is preparation. This part of the process is essential for ensuring that the flowers maintain their shape and color during pressing. I start by gently removing any leaves or unwanted stems, as these can interfere with the pressing process.
I’ve found that keeping the flowers as clean as possible helps them look more polished in the end. After that, I give them a light rinse to remove any dirt or insects that may have clung to them during harvesting. After rinsing, I carefully pat the flowers dry with a soft cloth or paper towel.
It’s important to be gentle during this step; I’ve learned the hard way that rough handling can bruise delicate petals. Once they’re dry, I arrange them in a way that highlights their natural beauty. Sometimes, I’ll experiment with layering different types of flowers or even incorporating leaves for added texture.
This creative arrangement not only makes the pressing process more enjoyable but also allows me to envision how the final product will look.
When it comes to pressing flowers, I’ve experimented with both traditional and microwave techniques, each offering its own unique advantages. The traditional method involves placing flowers between sheets of absorbent paper and then stacking them under heavy books or a flower press. This technique requires patience, as it can take several weeks for the flowers to fully dry and flatten.
However, I appreciate the meditative quality of this method; it allows me to slow down and enjoy the process of creation. On the other hand, I’ve found that using a microwave can significantly speed up the pressing process. By placing flowers between two pieces of parchment paper and microwaving them for short intervals, I can achieve beautifully pressed blooms in just a few minutes.
This method is particularly useful when I’m eager to see immediate results or when I’m working with a larger batch of flowers. However, I’ve learned that it requires careful monitoring to avoid burning or over-drying the petals. Each technique has its merits, and depending on my mood or time constraints, I choose accordingly.
Tips for Achieving Vibrant and Long-Lasting Results
To achieve vibrant and long-lasting pressed flowers, I’ve developed a few key tips over time. First and foremost, timing is everything. I always aim to press flowers at their peak bloom, as this is when they are most colorful and full of life.
Additionally, I’ve discovered that using fresh flowers rather than dried ones yields better results; fresh blooms tend to retain their color more effectively during the pressing process. Another tip I swear by is using high-quality absorbent paper for pressing. I prefer using blotting paper or parchment paper because they effectively wick away moisture while allowing for even pressure distribution.
This helps prevent any unwanted browning or discoloration during the drying process. Furthermore, I make sure to store my pressed flowers in a cool, dark place while they dry; exposure to sunlight can fade their colors over time.
Creative Uses for Pressed Flowers
| Creative Uses for Pressed Flowers | Benefits |
|---|---|
| Decorating Greeting Cards | Personalized and unique touch |
| Creating Artwork | Natural and delicate designs |
| Making Potpourri | Natural fragrance and decoration |
| Designing Jewelry | Unique and colorful accessories |
The beauty of pressed flowers extends far beyond mere decoration; there are countless creative uses for these delicate pieces of art. One of my favorite ways to incorporate pressed flowers is by creating handmade greeting cards. By gluing pressed blooms onto cardstock, I can craft personalized cards for birthdays, anniversaries, or just because.
The tactile quality of the flowers adds a unique touch that store-bought cards simply can’t replicate. I’ve also enjoyed using pressed flowers in home decor projects. For instance, I’ve made framed art pieces by arranging pressed flowers in aesthetically pleasing patterns within shadow boxes or picture frames.
These pieces serve as beautiful conversation starters and add a touch of nature to my living space. Additionally, I’ve experimented with incorporating pressed flowers into resin crafts, creating coasters and jewelry that showcase their beauty in a more durable form.
Preserving Pressed Flowers
Once I’ve successfully pressed my flowers, preserving them becomes a priority to ensure they last for years to come. One method I often use is sealing them with a clear spray sealant or mod podge. This protective layer not only enhances their vibrancy but also shields them from dust and moisture damage.
When applying the sealant, I make sure to do so in a well-ventilated area and follow the instructions carefully to avoid any mishaps. Another preservation technique involves storing pressed flowers in an airtight container away from direct sunlight. This helps prevent fading and keeps them looking fresh for longer periods.
I often use acid-free tissue paper to separate individual pieces within the container, ensuring they don’t stick together or get damaged during storage. By taking these steps, I can enjoy my pressed flower creations without worrying about their longevity.
Troubleshooting Common Pressing Problems
Despite my best efforts, there have been times when pressing flowers hasn’t gone as planned. One common issue I’ve encountered is browning or discoloration during the drying process. In these instances, I’ve learned that using fresher blooms and ensuring they are completely dry before pressing can make a significant difference.
Additionally, avoiding exposure to direct sunlight while they dry has proven effective in preserving their original colors. Another problem I’ve faced is petals curling or losing their shape after pressing. To combat this issue, I’ve found that arranging flowers in a way that minimizes overlapping can help maintain their structure during drying.
If petals do curl despite my efforts, I’ve discovered that gently re-flattening them under weight after pressing can sometimes restore their original form.
Advanced Techniques for Experienced Pressers
For those who have mastered the basics of flower pressing and are looking to elevate their skills further, there are several advanced techniques worth exploring. One such technique involves layering multiple types of flowers together to create intricate designs or patterns within a single pressed piece. This requires careful planning and an eye for color coordination but can result in stunning visual effects.
Another advanced method I’ve experimented with is using botanical inks made from pressed flowers themselves to create unique prints on fabric or paper. By soaking fabric in water infused with flower pigments and then layering pressed blooms on top before drying them together, I’ve been able to create one-of-a-kind textile art pieces that celebrate nature’s beauty in a new way. In conclusion, flower pressing is an art form that combines creativity with nature’s beauty.
From choosing the right blooms to mastering advanced techniques, each step offers an opportunity for personal expression and exploration. Whether I’m crafting cards or creating home decor pieces, the joy of working with pressed flowers continues to inspire me every day.
If you’re looking to bring the beauty of spring flowers into your home in a unique way, consider trying out some flower pressing techniques. This relaxing and creative activity can help preserve the vibrant colors and delicate shapes of your favorite blooms. For more tips on creating a serene home environment where you can enjoy your flower pressing projects, check out this article on crafting a serene home environment.
FAQs
What is flower pressing?
Flower pressing is a method of preserving flowers by flattening and drying them, typically between the pages of a heavy book or using a flower press.
Why do people press flowers?
People press flowers as a way to preserve their beauty and create decorative items such as framed art, greeting cards, and bookmarks. Pressed flowers can also be used in craft projects and as botanical specimens for educational purposes.
What are the best flowers for pressing?
Thin-petaled flowers such as daisies, pansies, violets, and ferns are ideal for pressing. Flowers with thicker petals or high moisture content, such as roses and tulips, may not press as well.
How do you press flowers using a flower press?
To press flowers using a flower press, place the flowers between layers of absorbent paper, such as blotting paper or parchment paper, and then tighten the press. Leave the flowers in the press for several weeks until they are completely dried and flattened.
How do you press flowers using a book?
To press flowers using a book, place the flowers between the pages of a heavy book, making sure to space them out and avoid overlapping. Place additional weight on top of the book, such as more books or a heavy object, and leave the flowers to dry for several weeks.
How long does it take to press flowers?
The time it takes to press flowers varies depending on factors such as the thickness of the flowers and the method of pressing used. Generally, it takes several weeks for flowers to dry and flatten completely.
How do you preserve pressed flowers?
To preserve pressed flowers, store them in a dry, cool place away from direct sunlight. It is best to frame pressed flowers or place them in airtight containers to protect them from moisture and dust.


 using WordPress and
No responses yet